Downloads & Instructions for Advantus Printable Wristbands
(Item Numbers 75696 and 75697)
Designing your own wristbands is easy with Advantus Printable Wristbands. We offer a free template for Microsoft Word along with detailed instructions (below). An editable template for Adobe Illustrator is also available. These templates allow you complete flexibility to create multiple designs on the same sheet and add your own images, logos, etc.
Templates for Advantus Printable Wristbands
Download Template for Microsoft Word (Microsoft Word 97 or later)
Download Template for Adobe Illustrator (CS4 or later)
Printing Instructions and Test Sheets
Download Printing Instructions (Including Printer Loading Guide)
Download Additional Test Sheets
Microsoft Word Template Editing Instructions
1. Open the Microsoft Word template.
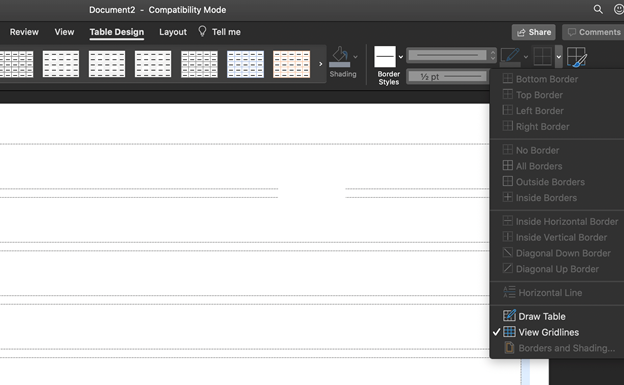
2. If the borders are not showing, go to Table Design -> Borders -> View Gridline. (In older versions of Microsoft Word, this setting can be found under Table Tools > Layout > View Gridlines). Note: It may appear that the bands are extending beyond the right of the page – this is expected and will allow for any color / design applied to print on as much of the band as possible.

3. Fill in the bands to your color preference.
4. Under Table Design (or in some versions, Table Tools -> Design), you should see the shading button.
5. Click in the band you want to shade and select your color.


6. If the color you want is not listed, go to more colors to view more options.

7. Click OK. Your band will be shaded that color. Repeat the process for all bands.


8. If you wish to add text, click on the band. Center the text by clicking the center button.

9. To bring the text down to the middle of the band, press Shift+Enter on your keyboard. Type your desired text.
10. Adjust font, color, and size to your liking.

11. Repeat for all bands.
12. If you wish to add a logo, click on Insert -> Image (or in some versions, Insert -> Pictures) and select the image file you’d like to insert.


13. You may need to adjust the format to get the logo to properly fit.
14. To do this, select the image, then click Picture Format -> Layout Options -> More Layout Options (or, in some versions: Picture Tools -> Format -> Position).


